


Armchair General: The Battle of Hoth

Entry posted by Stalliongrad
5,757 views
The Battle of Hoth was the most decisive victory of the Galactic Empire during its participation in the Galactic Civil War. (GCW)

Rebel Alliance soldiers preparing the trenches
Conflict: Galactic Civil War
Date: 3 ABY (After the Battle of Yavin)
Location: Echo Base, Hoth
Imperial Objectives: The Empire's main objective during this conflict was to lower the planetary shield generators, which were raised when the Imperial Fleet exited Hyperspace too close to the Hoth System. The planetary shield generators protected the planet from orbital bombardment, had these generators not been in place the battle would not have taken place because the Imperial Navy would have attacked from orbit. Major General Maximilian Veers was in command of the ground effort, tasked with the objective of destroying the generators so that the planet would be susceptible to orbital attack. The size of the Imperial Fleet (8 Ships including the Executor SSD) gave the Empire superior numbers along with the 9 AT-AT walkers gave the Imperial side the strategic tactical advantage.
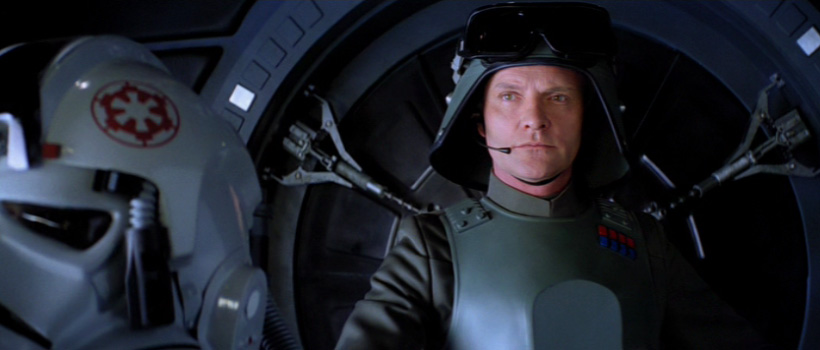
Major General Maximilian Veers led the Imperial invasion from the front aboard AT-AT Blizzard 1
Rebel Objectives: After suffering heavy losses at the Battle of Yavin, Rebel leadership under the direction of Senator Bail Organa and Luke Skywalker had chosen Hoth as a contingency plan in case Yavin was ever lost. It was at this stage the Rebellion was able to construct one of the last major strongholds. Loosing Hoth would send the Rebel forces into disarray. After Rebel forces were able to detect the presence of the Imperial Fleet, The planetary defense grid was raised and evacuation of the base commenced. Rebel Leadership did not once consider the option of holding Echo Base immediately knowing they would be severely outnumbered. Rebel numbers were important to protect evacuation of Echo Base was the Primary Rebel objective. Protecting escaping transports was a secondary objective, which they were able to do with the use of Ion Cannons. When hit, Imperial Star Destroyers were temporarily unable to target, fire or maneuver. General Carlist Rieekan was in command and at the time insisted on protecting the transports until the last possible moment.

General Carlist Rieekan remained in the Echo Base control room during the battle monitoring the progress of escaping Rebel transports.

Map of Hoth detailing the Battle of Echo Base
Initial Assault: Rebel Forces spent hours preparing trenches and readying turrets for the impending Imperial invasion force. All in vain due to the Imperial use of Probe and Sensor droids which managed to slip past and collect information. The Imperial landing zone stood a few miles away from Echo Base and the Shield Generator. 9 AT-AT walkers each given a call-sign Blizzard (collectively known as Blizzard Force) began making their way toward the base. Major General Maximilian Veers commanded from the front aboard AT-AT Blizzard 1. Echo Base was home to 3 airfields each hosting a squadron of Snowspeeders and X-Wing fighters which were mobilized before the battle began. The first volley of shots were fired from Imperial AT-AT walkers of Blizzard Force which after a short trek encountered the first series of Rebel trenches and Snowspeeders of Rogue Squadron. Imperial Snowtroopers disembarked from Blizzard Force walkers and began assaulting the trenches and tunnels while being covered by the AT-AT and smaller AT-ST walkers. Imperial Turbolasers were extremely effective against Rebel Snowspeeders and defensive fortifications.

Artists Depiction of the destruction of the Rebel Shield Generator
Rebel troops committed to the evacuation were initially successful at distracting the Imperial Forces long enough for Rebel GR-75 Transport ships to escape. 17 of 30 Transports were lost which accounted for half of the Rebel Forces heavy losses. As Imperial forces destroyed the Generator and turned their attention to the base itself, Rebel Forces were still committed to firing the Ion Cannons to protect escaping transports. After the Cannons were destroyed or rendered inoperable, the crew assigned to those stations began their evacuation they were however too late as Echo Base was infiltrated by Darth Vader and 501st Legion snowtroopers.

Darth Vader and the 501st Legion arrive on Echo Base
Final Retreat: The final transports to evacuate were escorted by the last remaining X-Wing fighter escorts available. They were located on small landing pads outside of Echo Base toward the rear. There were many Rebel Soldiers who were not able to make it aboard the last escaping transports and were taken prisoner by the Snowtroopers who defeated them.
Outcome: Decisive Imperial Victory, Rebel Loss of Echo Base.

Artists Depiction of the Rebel Defeat at Echo Base
0 Comments
Recommended Comments
There are no comments to display.
Create an account or sign in to comment
You need to be a member in order to leave a comment
Create an account
Sign up for a new account in our community. It's easy!
Join the herd!Sign in
Already have an account? Sign in here.
Sign In Now