RyuNeko 46 February 7, 2014 Share February 7, 2014 Decided to put the base paint on tonight instead of waiting till Friday night. Just put a couple coats of blue on it and that's about it. Sorry it's not more than that. My wife will do the detailed work: the stripes, eyes, hair (all being painted), etc. and while she's doing that I will build a base for her to stand on. What will the base look like? Not tellin' ya. BUT, it will make this look that much more awesome.....................................I hope. LOL. Here it is: 10 Link to comment Share on other sites More sharing options...
Deesinn 393 February 7, 2014 Share February 7, 2014 Duuuude, fucking brohoof! /) 1 Link to comment Share on other sites More sharing options...
True Rarity 1,240 February 7, 2014 Share February 7, 2014 That's really good so far! The lighting makes the paint look a little dark, but you did an excellent job. ^^ I can't wait to see the turnout! 1 My deviantART Link to comment Share on other sites More sharing options...
RyuNeko 46 February 7, 2014 Author Share February 7, 2014 That's really good so far! The lighting makes the paint look a little dark, but you did an excellent job. ^^ I can't wait to see the turnout! Yeah, unfortunately the paint did turn out a little dark. It looks pretty good in natural light though. I can't wait for this to be done. My very first 3D, built by hand thing. I'm so excited. I will be starting to design and build the base tonight and my wife is going to paint the details. Tonight is going to be so much fun. Link to comment Share on other sites More sharing options...
True Rarity 1,240 February 7, 2014 Share February 7, 2014 Tonight is going to be so much fun. I'll bet it is. Someday I'll carve my own pony figurines. But, for now, I'm happy with drawing them. 1 My deviantART Link to comment Share on other sites More sharing options...
RyuNeko 46 February 7, 2014 Author Share February 7, 2014 I'll bet it is. Someday I'll carve my own pony figurines. But, for now, I'm happy with drawing them. OOOHHH, carving. That's another thing I would like to learn. Using chisels and knives. But, the wife says I can't just quite yet. She says I still need my fingers. LOL. Someone I talked to about it before suggested starting with using soap since it's much softer and easier to use. You could probably try that and see how it goes. Link to comment Share on other sites More sharing options...
True Rarity 1,240 February 7, 2014 Share February 7, 2014 OOOHHH, carving. That's another thing I would like to learn. Using chisels and knives. But, the wife says I can't just quite yet. She says I still need my fingers. LOL. Someone I talked to about it before suggested starting with using soap since it's much softer and easier to use. You could probably try that and see how it goes. Hmm, soap, you say? That's a good idea. I'll try it sometime and have my own pony bar of soap. XD 1 My deviantART Link to comment Share on other sites More sharing options...
RyuNeko 46 February 8, 2014 Author Share February 8, 2014 Hmm, soap, you say? That's a good idea. I'll try it sometime and have my own pony bar of soap. XD Duuuude, fucking brohoof! /) Here is another WIP pic. Just need to accentuate the wings on this side then the other side is all that's needed to be painted. Ok, both sides have been painted now. All that's left is the base. I am so excited. Putting the base on here will make it look rediculously awesome. Anyone want to take any guesses as to what the base will be? Link to comment Share on other sites More sharing options...
True Rarity 1,240 February 8, 2014 Share February 8, 2014 Here is another WIP pic. Just need to accentuate the wings on this side then the other side is all that's needed to be painted. pony WIP 2.jpg Ok, both sides have been painted now. All that's left is the base. I am so excited. Putting the base on here will make it look rediculously awesome. Anyone want to take any guesses as to what the base will be? That is amazing! Keep up the excellent work! (and to your wife, too!) Guessing what the base will be? Um... a cloud? 1 My deviantART Link to comment Share on other sites More sharing options...
Courageous Thunder Dash 7,828 February 8, 2014 Share February 8, 2014 Oh now that is awesome! Keep it up! 1 Youtube: https://www.youtube.com/channel/UCeWg-TtBRMfqketa1ELyKGg Soundcloud: https://soundcloud.com/menelik-david-kenneth-cannady 2nd SoundCloud: https://soundcloud.com/thunder-dash-alternative/tracks Pony.fm: https://pony.fm/thunder-dash Link to comment Share on other sites More sharing options...
RyuNeko 46 February 8, 2014 Author Share February 8, 2014 That is amazing! Keep up the excellent work! (and to your wife, too!) Guessing what the base will be? Um... a cloud? Hmmmmmmmm.............IDK. :comeatus: How do you think it would look if I added a cloud to the side? Oh now that is awesome! Keep it up! Thank you very much. I most certainly will. 1 Link to comment Share on other sites More sharing options...
RyuNeko 46 February 10, 2014 Author Share February 10, 2014 Bad new for this piece. It broke. :okiedokielokie: One of my cats decided to knock it over when I wasn't looking. Broke the back legs, tail and one of the wings. We MIGHT be able to glue it back together but I doubt the tail can be saved. I am very upset right now. I had just finished the painting and cut out of the base yesterday. All I needed was to attach a rod for better stability. I guess I'll try glueing it together and see how it looks. Guess it will be our mantle piece now. Anyways, thought I'd let you guys know what was going on since I was going to post the final picture tonight of the whole thing. The next pic of this might be tailless. Link to comment Share on other sites More sharing options...
RoguesWolfe 192 February 10, 2014 Share February 10, 2014 Bad new for this piece. It broke. :okiedokielokie: One of my cats decided to knock it over when I wasn't looking. Broke the back legs, tail and one of the wings. We MIGHT be able to glue it back together but I doubt the tail can be saved. I am very upset right now. I had just finished the painting and cut out of the base yesterday. All I needed was to attach a rod for better stability. I guess I'll try glueing it together and see how it looks. Guess it will be our mantle piece now. Anyways, thought I'd let you guys know what was going on since I was going to post the final picture tonight of the whole thing. The next pic of this might be tailless. Aw man that is horrible, hopefully it can be fixed. I know how that feels to put so much work into a project then something happens. 1 Created by WarriorShy! Link to comment Share on other sites More sharing options...
RyuNeko 46 February 10, 2014 Author Share February 10, 2014 Aw man that is horrible, hopefully it can be fixed. I know how that feels to put so much work into a project then something happens. I am going to go and get arrow glue today after work and try to put her together. I'm really upset because I wanted to save her for a Brony/Pony con and put in their charity auction. Came up with a smaller design las night so I will work on that tonight. Still the same shape but it will look a bit different. As I said before though, I will post a pic when this is glued back together so everyone can see what it should have looked like. Link to comment Share on other sites More sharing options...
iceestarz 5,800 February 10, 2014 Share February 10, 2014 Bad new for this piece. It broke. :okiedokielokie: One of my cats decided to knock it over when I wasn't looking. Broke the back legs, tail and one of the wings. We MIGHT be able to glue it back together but I doubt the tail can be saved. I am very upset right now. I had just finished the painting and cut out of the base yesterday. All I needed was to attach a rod for better stability. I guess I'll try glueing it together and see how it looks. Guess it will be our mantle piece now. Anyways, thought I'd let you guys know what was going on since I was going to post the final picture tonight of the whole thing. The next pic of this might be tailless. Cats, cats are satan... I've had my cat ruin some of my work, not pleasant at all. Still, I hope you're able to salvage it and good luck on your smaller one! 1 Link to comment Share on other sites More sharing options...
Proctra Music 335 February 11, 2014 Share February 11, 2014 Damn dude! That's really cool lookin. Can't wait for some updates :3 1 Link to comment Share on other sites More sharing options...
RyuNeko 46 February 11, 2014 Author Share February 11, 2014 Damn dude! That's really cool lookin. Can't wait for some updates :3 Tuesday I will start on making a smaller one (get all of the pieces cut out and start sanding) and get a "shaped" jewelry box cut out. I forgot to get arrow glue while I was out after work today so glueing my large RD will have to hold off till tomorrow as well. When I get the base shape of the jewelry box cut out I'll take a pic and show people what it looks like before I etch it............to see if anyone can guess what it is. Link to comment Share on other sites More sharing options...
Proctra Music 335 February 11, 2014 Share February 11, 2014 Tuesday I will start on making a smaller one (get all of the pieces cut out and start sanding) and get a "shaped" jewelry box cut out. I forgot to get arrow glue while I was out after work today so glueing my large RD will have to hold off till tomorrow as well. When I get the base shape of the jewelry box cut out I'll take a pic and show people what it looks like before I etch it............to see if anyone can guess what it is. Can't wait to see the progress man, good luck. 1 Link to comment Share on other sites More sharing options...
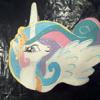
RyuNeko 46 February 13, 2014 Author Share February 13, 2014 Ok, here up update picture of current projects. I'm posting this here first to see if I can get any views, if not then I will start a new thread with these in it. Jewelry box: I took a character's head and cut it out using a 2" thick board (so it's about 1.25" - 1.5" thick of usable space) and 2 different sized craft plywood for the bottom and lid. The whole head can be used as a jewelry/trinket box. The lid will be removable as I am going to use a dowel rod as the swivel. I will get the face etched out Wednesday night on the lid. Tonight (Tuesday) I got it all cut out and put the bottom piece on and mudded and sanded it. Model: This is a much smaller version of our large RD model, with a slight change to the head. Can't really see it in the picture but there are actually three "head" pieces. When we get it put together I'll take a side view and front view images. All I got done with this tonight (Tuesday), other than get it cut out, is getting the four legs sanded and rounded the way I want them. Wednesday night I will try to get a couple more pieces rounded and sanded; depends on how long it takes me to etch and sand the lid of the box. Both of these pieces will be painted when they are finished. I decided to go ahead and post the etched lid. All it needs is it's finish sanding (already rough sanded) then the box will begin to be painted. What do you think of her so far? Took me about 3 1/2 hours to etch out. Link to comment Share on other sites More sharing options...
iceestarz 5,800 February 13, 2014 Share February 13, 2014 Ok, here up update picture of current projects. I'm posting this here first to see if I can get any views, if not then I will start a new thread with these in it. Jewelry box: I took a character's head and cut it out using a 2" thick board (so it's about 1.25" - 1.5" thick of usable space) and 2 different sized craft plywood for the bottom and lid. The whole head can be used as a jewelry/trinket box. The lid will be removable as I am going to use a dowel rod as the swivel. I will get the face etched out Wednesday night on the lid. Tonight (Tuesday) I got it all cut out and put the bottom piece on and mudded and sanded it. jewelry box head.jpg Model: This is a much smaller version of our large RD model, with a slight change to the head. Can't really see it in the picture but there are actually three "head" pieces. When we get it put together I'll take a side view and front view images. All I got done with this tonight (Tuesday), other than get it cut out, is getting the four legs sanded and rounded the way I want them. Wednesday night I will try to get a couple more pieces rounded and sanded; depends on how long it takes me to etch and sand the lid of the box. model WIP 2.jpg Both of these pieces will be painted when they are finished. I decided to go ahead and post the etched lid. All it needs is it's finish sanding (already rough sanded) then the box will begin to be painted. What do you think of her so far? Took me about 3 1/2 hours to etch out. DUDE. That is just plain amazing. Like omg, I'm really jealous. Now you got me wanting to try this out. 1 Link to comment Share on other sites More sharing options...
branfeynt 101 February 13, 2014 Share February 13, 2014 Hello, RyuNeko! It's an amazing work of art! I always wonder how people can create such things! It's just great! 1 Link to comment Share on other sites More sharing options...
RyuNeko 46 February 13, 2014 Author Share February 13, 2014 Hello, RyuNeko! It's an amazing work of art! I always wonder how people can create such things! It's just great! Thank you very much. I made a blog asking if people would like to see short clips of each step to see how I do it. I figured it would be good for artists (or anypony for that fact) to see how Bronies/Ponies do what they do. I know I'd personally like to see short clips of someone that sculpts their pieces. 1 Link to comment Share on other sites More sharing options...
RyuNeko 46 February 15, 2014 Author Share February 15, 2014 Finally got her finished. She is ready to go to one of Pinkie Pies parties now. She turned out wonderful if I do say so myself. What do you guys think of her? 3 Link to comment Share on other sites More sharing options...


Recommended Posts
Create an account or sign in to comment
You need to be a member in order to leave a comment
Create an account
Sign up for a new account in our community. It's easy!
Join the herd!Sign in
Already have an account? Sign in here.
Sign In Now